28 Mar Installing and Setting Up Project Tango and Unity on OSX
You will find a great tutorial on getting setup over at Project Tango Developer Support. It lacks a little detail however and some info is split between different articles so we’ve put together a step by step breakdown to help accelerate your introduction to Tango development on Mac OSX.
The setup illustrated in this Project Tango Tutorial is OSX Yosemite 10.10.1 and we will be downloading all the required components from scratch for a completely clean setup. Keep in mind these tools will take up to 5 Gigs on your hard drive so now is the time to do some spring cleaning if you need to.
Installing Android SDK
The first item on our list is the Android Software Development Kit. If you are not familiar with this it’s the standard development IDE, debugger and emulator (simulated operating system) for creating Android applications.
Download the Android SDK here you will need package level 17 or greater. (Package level is similar to Versioning, the higher the level the higher the version)

Click on the download button, agree to the terms and conditions once you have read them from start to finish of course! Download the Mac DMG installation package to any folder you choose. Once the DMG had downloaded, double click on it to begin the setup process.
Installing Unity with Android Support
Next up we need to install Unity with Android support. Unity is a one of the most popular game development platforms out there and a strong favourite for mobile game development in both 2d and 3d. The good news is Unity has an installation type to suit all budgets. For the purpose of this tutorial we are going to use the free Personal Edition.

Download the installer making sure that it is set for Mac OSX. Save your Unity Download Assistant DMG to your hard drive as before and double click to start installation.
In the Download Assistant Wizard make sure you have Android Support checked in the components section before proceeding, this is important.

You will be asked to setup a user account with Unity and fill out some details. You will need this to complete setup and sign into Unity so make sure to provide all the correct details and email address for verification.
Setting up The Tango Motion Tracking Project in Unity
Once installed now we can run Unity from our Applications folder.

Go to File > New Project If that is greyed out in the menu selection click the New Icon in the screenshot above to open the new project dialogue. Enter a project name of your choice you can leave the location of the project as standard and make sure that the Project Type is 3D. Then click Create project.

Downloading and Importing the Project Tango SDK
You can find the Project Tango SDK at the Google Developers Site. Make sure to download the correct SDK for your version of Unity. At the time of this tutorial it was version 5. TangoSDK_Jih_Unity5.unitypackage.

Now lets go back to our new project we opened earlier in Unity. Go to the Menu and Assets>Import Package>Custom Package. Select the package you previously downloaded and double click or open. You should then see this dialog box appear in Unity. Make sure all the options are checked in advance and then click import.

You should now see the assets added in your project view in the bottom panel of Unity.
Adding the Project Tango Prefabs to Your Hierarchy

Click on the TangoPrefab folder in the Project Panel at the bottom of the Unity window. Now click and drag the Tango Manager prefab Icon and the Tango Delta Camera Icon (See above) to the panel on the top left.

Setting the Scence
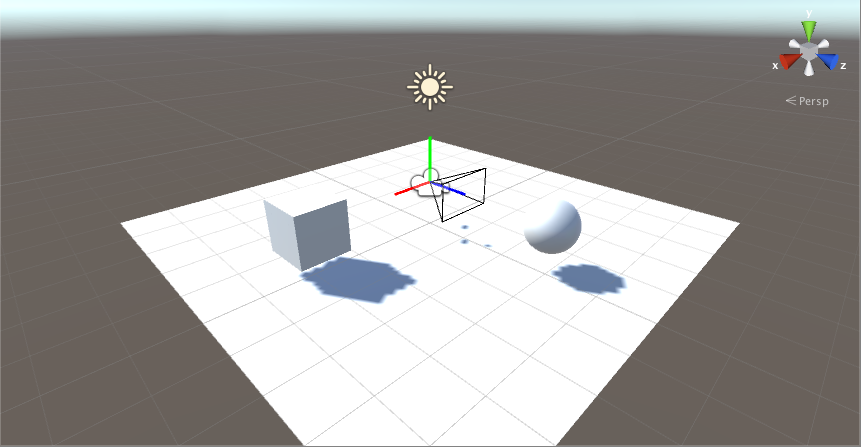
Lets create our scene by adding a cube. Go to the Unity Menu and Game Object>3d Object>Cube. it will appear in the centre of your scene. Repeat this for Plane and a Sphere.

Click on the new cube and you will see a list of object attributes displayed in Unity’s inspector on the right hand side of the window. Set the Position to to X:3 Y:1 Z:0. Repeat this for the Plane 0,0,0 and Sphere 0,1,3. You can select each one by clicking it in the scene window or by selecting it in the Hierarchy panel on the left. Now select the Directional Light and apply the coordinates of 0,3,0. Your Hierarchy and Scene should now look like the screen shot below:

The Tango Delta Camera will be our view point. Directional light is coming from above. Once we start our mini game we will be pointed at the Sphere and will be able to pan to the Cube.
Setting up the Build Settings
Go to File>Build>Settings. Click on the Android platform in the platform list. Click Switch Platform and then Player Settings.

In the Unity window on the right hand side you will see the Player Settings panel. Set the Orientation to Landscape Left.

Below the resolution and presentation options you will see Other Settings, click on this and set the preferences to the same below.

In the bundle identifier add your unique app identification name. This is used when the app is uploaded to the Google Play Store. For now it’s not that important. They usual syntax is com.companyname.appname. You could use com.acme.motiontracktest. Also you need to set the Minimum package API level to 17+ in this case Android 4.2.
Connecting Unity to Your Project Tango Device via ADB
Now it’s getting to the exciting part. Almost there. First you will need to connect your Project Tango device via USB to your Mac. You won’t see the Tango show up as a new device in your Finder window. If you have Android file transfer installed this may start but it is not needed.
Firstly you need to enable the USB Debugger on the Tango Tablet. Go to Settings > About > About Tablet. Here you click on the Build Number 7 Times. You will see a dialog popup letting you know you are now setup as a developer. Move back a screen to About Tablet. Now you will see {} Developer Options click on this and then check USB Debugging. You can learn more about it here on the Android Developer Site if needed. You may get presented with an RSA authentication on the Tango screen when you first connect make sure to accept this.
Building and Running
With the your Tango device plugged into your Mac and USB debugging enabled go back to Unity Build>Run. You will be asked to locate your Android SDK the first time you build and run. You can find this by going to Unity and File>Preferences>External Tools.

In my case on the Mac Yosemite it’s /Users/<username>/Library/Android/SDK
You may also get an error saying that no android device was located. Most of the time this can be resolved by restarting your android device, making sure USB debugging mode is enabled. And plugging the USB in and out of course. If you are running Windows or other you may have to download specific drivers here.
Conclusion
Great. So hopefully you have located your SDK, your device has been recognised and you have not been presented with any other errors. If that is the case when you ran the app from Build>Run you saw a small processing dialog and then Unity returned to normal. On your connected Project Tango device make sure that it is unlocked and sitting on the home screen. You will see a Unity splash screeen followed by a “Hold Tight” loading bar. And then voila your first Project Tango Unity App should be rendered on your device. At this point you can untether the USB and take a walk around the sphere and cube and give yourself a well deserved pat on the back. We hope you found this tutorial helpful, and would love to hear from you in the comments. If you have made it this far take an extra 30 seconds to introduce yourself!
Something Went Wrong 🙁
So what happens if you are getting errors or the setup wasn’t as fairytale as you would have liked? We’d be happy to help. Leave your questions in the comments below or if you are in a hurry checkout our article on Project Tango Resources and Support for a list of stack overflow and Google Plus communities that can help you trouble shoot.


No Comments